
Media Production for Flexible Teaching
Introduction
In this Guidebook, we’ll introduce you to methods for producing effective media for flexible teaching. We’ll cover the features of different types of media lectures and activities as well as how to choose the right type of media for your content.
Creating your content with a variety of media styles is a part of good practice for universal design. Providing multiple access points to the content for your students is not only important for students who have known specific learning needs, but also is proven to be beneficial for learners broadly (Dolmage, 2015). Multiple access points also afford additional flexibility to students with a variety of home environments, time zones, and other constraints. For example, a text lecture, or transcript of a video lecture, may be more accessible not only to a student with a hearing impairment but also to a student currently living in a location with poor internet connection or a busy household where a video lecture is likely to be interrupted.
Below, we will show you how to break up your content into sections and consider the media delivery option best suited to that content and your learning goals for students. By choosing the right medium, you can foster better retention and engagement for students as well as minimize fatigue. For example, research shows that videos under 10 minutes are very effective in maintaining the viewer’s attention (Guo et al, 2014); a longer, narrative lecture might be better suited to a podcast format.
To get started creating your multimedia lectures, gather your existing lecture content, such as PowerPoint slides or notes, in order to take the first step: create a script with your existing content. If you’re not sure which format you want to use yet, go ahead and start writing your script. Sometimes the appropriate format becomes clear as you write, and you can always go back and make adjustments. See the appendix for How to Script.
Table of Contents
Other Resources
Choosing the Right Media

Video Lecture
Video lectures are ideal for highlighting key concepts and/or visual concepts paired with your narration and explanation. The video format also gives students the flexibility to easily review (or preview) these concepts outside of live class sessions, which allows them to connect with you as their Professor and with the material.
Audio Lecture
Audio lectures are best for storytelling and example-based learning that do not require visuals. They provide students with flexible access points and can be listened to during daily routines or while doing other things. When accessed outside a class setting, they can prompt students to think about topics discussed and even subconsciously apply them to their lives. There’s also the affect factor; many of us feel more relaxed when we only have to record audios and therefore less self-conscious about our appearance. Your students will sense this, and they will likely experience more personal connections.
Recorded Interview
A polished interview, recorded via either video or audio, can help you deliver content by tapping into the wisdom of thought-leaders and working professionals. Expert interviews enrich content by giving students access to real-world experience and opinions from experts in their content area. It’s a great way to offer diverse lines of thinking on emergent or contested issues.
Text Lecture (or Text with Graphics)
You can create a written version of content delivery in place of a video lecture, and your students can read it within your online course environment. You can think of these as web-based, custom textbooks that students can interact with on the learning management system. When used well, they will allow you to quickly and effectively communicate concepts. They are easy to create, edit, revise and update, so that you can focus on developing more time-intensive materials. Compared to other methods of content delivery (such as video or audio), they also require the least internet bandwidth for students, and therefore should be considered if you are concerned about equity and access issues.
Production
Video Lecture
Video Lectures are ideal for teaching a focused, discrete topic. A “talking head” video simulates intimate face-to-face interaction with students and provides depth and context for materials that require a strong visual element. It also offers the opportunity to use visual cues and body language when delivering the content. Research has indicated that instructor presence can improve transfer performance and reduce cognitive load for difficult topics (Wang et al, 2020).
To achieve good video/audio quality, here’s a checklist that you can refer to before you start recording.
- Choose a location that has:
- Static/Non-distracting background
- Plentiful lighting (We highly suggest facing a window)
- Minimal background noise
- Frame yourself from below your elbows to just above your head

- Try to look at the lens when speaking
- Have an external microphone close to your mouth (in this example you can see the lavalier mic on the subject).
Be sure to record a test clip and watch it before recording the full lecture.
Record in Panopto
Record your video in Panopto by following the steps in the instructions below. Make sure you access Panopto via your Canvas course. If you do not have Panopto enabled in your Canvas course, follow the steps in How to Enable Panopto in Canvas.
Once you are done with the recording, the video will be automatically saved in your course Panopto folder. You can disregard the section below on “Post-production: Manage Videos”.
Record in Other Software
Audio Lecture
You can record an audio file using a voice-recorder app on your phone or Panopto/native recording application on your computer. The audio quality will be better if you use almost any type of external microphone. The ideal distance of the microphone from your mouth is 6-12 inches. Recordings will have less echo if recorded in a room with soft surfaces around. For example, you could record in your closet where there are soft clothes to dampen the echo.
We strongly suggest speaking from a script or a detailed outline which is especially easy when recording audio-only because your eye-line, or where you’re looking, doesn’t matter as long as you’re generally facing your microphone. Following an outline will also ensure that you stay on topic and dramatically reduce editing time in post-production. Record a test clip and listen to it before committing to the full lecture.
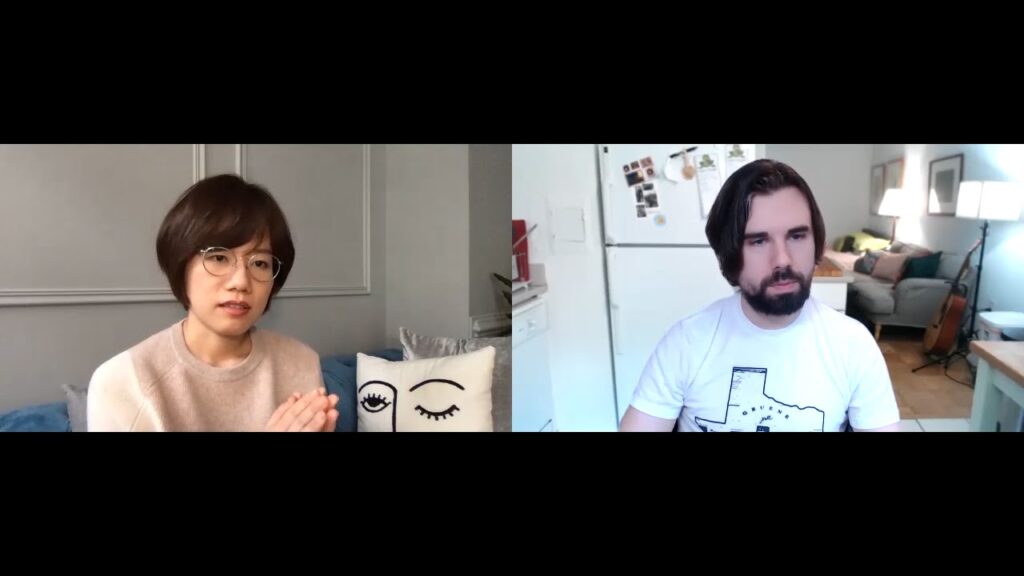
Recorded Interview
We suggest recording your interview using Zoom in Gallery View. You and your subject should be well-lit (we highly suggest facing a window), and properly framed: camera at eye-height, medium-shot (bottom of the frame somewhere around your elbows and top of the frame just above the top of your head.)
Additional examples and information can be found in this video tutorial on Zoom interviewing. Below are some points to consider for your interview:
Before the Interview
- What do you want the student to learn as a result of the interview?
- What are some of this person’s most notable qualifications and experiences that make the speaker relevant to your course?
- Is this person supporting or contesting your content?
- Have a set of key points that you want the interviewee to cover and then create questions around those key points
- Have 3-7 questions prepared
- Start with a few general questions then begin to specify
- Ask succinct questions, and avoid meandering or compound questions. It may be helpful to break a complex question into several smaller questions.
- Ask questions that have a balance between being open-ended and closed-ended. Completely open ended questions can lead to responses that are long and hard to edit down and closed-ended questions can lean to answers that are too short.
- Share questions with interviewee in advance of the interview
During the Interview
- Introduce yourself and the discussion topic, then ask the subject to introduce themselves
- For Q&A, make sure interviewee answers the question with sufficient context. For example, Q: What’s your favorite color? A: “My favorite color is blue.” Not A: “Blue.” or A: “What’s my favorite color? Blue.” This allows the interviewee’s responses to stand on their own in case you decide to edit the video later, such as to edit out a blooper or to highlight a single question from the interview.
- Ask follow-up and clarification questions if the material goes in an interesting or unexpected direction
- Don’t be afraid to ask interviewee to give a more condensed answer; you can edit the recording afterward in order to cut the longer answer
- If the interviewee makes a mistake or is unclear, ask them to restate their answer again and give them a minimal amount of general guidance
- Make sure interviewee is talking to the interviewer and not looking into the camera
- Mention that hand gestures make the interview more dynamic and can help the interviewee to loosen up
- Make sure interviewee is positioned within the camera frame so that they can be easily seen while remaining comfortable.
- Encourage the interviewee to be themselves. Your interview can be professional without being overly formal. Smiling, humor, and other little things that show the interviewee’s personality (and yours!) make the experience more engaging for the viewer. These humanizing moments are another opportunity to connect with your students and can be especially valuable in a fully online environment.
Text Lecture
There are times when explaining concepts in writing, instead of audio or video, will make the most sense.
You should try to stay away from having walls of text on one page. Remember, reading paragraphs on a backlit screen is a very different experience compared to reading a physical book. Consider grouping content under appropriate levels of headings to clarify the structure and make the content more digestible and accessible for screen readers. For similar purposes, try to use bullet points and tables whenever appropriate. You can also increase both focus and knowledge retention by using color and style treatment to emphasize critical concepts or information.
Images can also be used to enhance the learning experience. Decorative illustrations related to the content can serve as visual anchors for memory encoding, while charts and infographics may be essential to unpacking certain concepts. When possible, try to stick to images created by yourself or available under Creative Commons to avoid potential disputes in the future.
Aside from these traditional methods of delivery, you can experiment with tools that best help tell the story related to your content. For example, you can use timelines when laying out the historical context, use juxtapositions for comparisons, and embed 360 views to take students to the environment. Be aware that finding and maintaining appropriate tools can be challenging. Make sure you test that they work across platforms before publishing the pages, and check constantly to see if they still function throughout the course term.
You can view an example of a text lecture here.

Post-Production
Trimming and Editing
If you need to make small edits to your video after recording, such as trimming of the beginning or end of the video, this can be done in a simple video editor on your computer like Quicktime. Instructions are available on the Quicktime support site. If you have recorded your video in Panopto, or have uploaded your video to Panopto, you can also use the editing features there. Instructions for editing a video in Panopto are available at the Panopto website.
Embedding
You can embed shorter videos directly into the Canvas page. However, if you are uploading a longer video or you have already recorded your videos in Panopto, we recommend uploading your videos to Panopto and, if needed embedding the Panopto frame into the Canvas page. This allows you to upload larger, longer videos and also lets you take advantage of Panopto features like discussions and notes. Instructions for Embedding Panopto Videos in a Canvas Course are available at the Panopto website.
Transcription
One thing to note is that you should provide students with transcripts both for accessibility compliance and for students who wish to make notes or review the content. This can be accomplished using Panopto’s automatic speech recognition captions service.
Conclusion
As you work through your content, remember:
- Let the content inform the media format of the lecture, not the other way around.
- While you won’t be changing your content, lecturing in the online environment requires different considerations than lecturing in a classroom. You may need to create a greater number of smaller lectures rather than one longer lecture.
- No need to recreate the wheel: there may be existing resources you can use or modify to address your specific learning objectives or challenges.
Appendix
How to Script
Writing a Script (Video and Audio)
In general, using a script when you record will make your life easier, both during the recording of the video and in post-production. Spending more effort before you press record will relieve pressure while the camera is rolling. You can display your script on your screen in a word processor, piece-by-piece in a slide deck, or in an online teleprompter like EasyPrompter or PromptSmart.
Consider that students might be viewing these video recordings as stand-alone pieces and therefore you should provide some context before delving into the main content.
Script Breakdown
- Introduce yourself and the overall theme or topic area
- Highlight the key concepts that are going to be addressed in the recording
- Explain why these concepts are important
- Share the content you have outlined
- Summarize key takeaways
Script-writing Steps
- Make a list of all of the videos that will support students in your course.
- Write down the topic for each video.
- For each topic, write a paragraph describing what will be in the video.
- From that paragraph, write the subtopics or key terms you will address.
- For each subtopic, add a few bullet points outlining what you want to say. Identify visuals to be included.
- Expand your bullet points into full sentences and insert transitional sentences.
- Add an introductory paragraph that briefly describes the contents of the video and the context in which it should be understood.
- Add a paragraph at the end to review key take-aways.
If writing is not for you, try voice-to-text: On a Mac, use the “Accessibility” features or on PC under “Ease of Access,” turn on voice or speech recognition. Smartphones also have this capability, which means you can “lecture” while the computer records your words in Word or Google Docs. This method will give you a good first draft as a script to be further edited.
Bibliography
Dolmage, J. (2015). Universal Design: Places to Start. Disability Studies Quarterly, 35(2). https://dsq-sds.org/article/view/4632/3946.
Guo, P.J., Kim J., and Robin, R. (2014). How video production affects student engagement: An empirical study of MOOC videos. ACM Conference on Learning at Scale (L@S 2014); found at http://groups.csail.mit.edu/uid/other-pubs/las2014-pguo-engagement.pdf.
Wang, J., Antonenko, P., & Dawson, K. (2020). Does visual attention to the instructor in online video affect learning and learner perceptions? An eye-tracking analysis. Computers & Education, 146. https://doi.org/10.1016/j.compedu.2019.103779.